
The same 2000W conversion kit can feel like three different bikes. Set up one way it pulls away from lights so gently a nervous rider forgets the motor is there. Set up another way it launches hard enough on a loose track that the rear tyre has to be managed. The hardware does not change between those two experiences; four settings in the controller app do.
This guide explains what each of the four settings actually controls, gives three complete profiles that were built and tested on a 52V 2000W rear-hub kit, and draws the line between what programming can change and what it cannot. If you have opened a controller app, seen a screen full of percentages and closed it again, this is the page you were looking for.
The four settings that shape every ride
Modern Bluetooth controllers expose a lot of parameters. Four of them account for almost everything a rider feels.
| Setting | What it physically controls | What changes when you lower it | What changes when you raise it |
| DC Current | Maximum battery-side current the controller may draw | Softer peak demand, less voltage sag, calmer consumption | Harder acceleration, more heat, more load on BMS and connectors |
| Accelerate Strength | How quickly the controller ramps towards the current ceiling | Smoother starts, less wheelspin | Immediate response, more stress on drivetrain and torque arms |
| PAS level percentages | How much of the available power each assist level may use | Finer control at low levels | Bigger jumps between levels |
| Speed and throttle limits | The cut-off speed for assistance and throttle, plus walk mode | Lower cruising ceiling, longer range | Higher top speed; legal status is unaffected |
Two of these are widely misunderstood. DC Current is a ceiling: it caps how much the system can ask for, and it must sit below what the battery’s BMS can supply. Accelerate Strength is a ramp: it sets how fast the controller climbs towards that ceiling. A low ceiling with a steep ramp still feels abrupt; a high ceiling with a gentle ramp feels composed while keeping reserve for a hill.
Before you change anything: the BMS sets the real ceiling
Every profile below starts from one rule. The DC Current value must stay under the battery’s continuous discharge rating, with margin. A KirbEbike Taishan or HS-II pack is rated at 60A continuous, which gives a 2000W controller room to work. The Entry down-tube packs are rated 30A or 40A depending on model, and a controller left at its default maximum will trip their protection on the first serious climb.
So the first number you need is not in the app at all. It is printed on the battery listing. Write it down, subtract a margin of around 10–15%, and treat the result as the highest DC Current you will ever set for that pack.
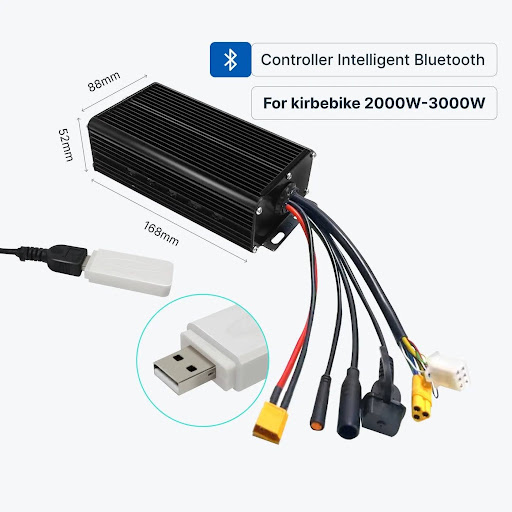
Smart ebike controller with its full wiring harness, Bluetooth programming dongle and labelled connectors
Profile 1: City control
Built for predictable starts, shared paths, wet junctions and the low-speed manoeuvring that a heavy converted bike makes awkward. The goal is to make high-power hardware respond calmly, not to pretend it is a 250W bicycle.
- DC Current: conservative. Roughly 55–60% of the pack’s BMS rating worked well on a 60A pack.
- Accelerate Strength: low. Starts should feel like a strong tailwind, not a push.
- PAS levels: close together at the bottom. Levels 1–3 spaced by small steps give fine control in traffic; levels 4–5 can stay higher for the occasional hill.
- Speed limit: set the ceiling your local rules and your nerves allow. On a high-power kit this is a control setting, not a compliance setting (more on that below).
- Walk mode: 6 km/h walk assist earns its place the first time you push the bike up a ramp with a full battery fitted.
A city profile is also kinder to the hardware. The motor wheel and battery add mass, and a gentle ramp means every pull-away loads the torque arms and spokes progressively rather than with a snap.
Profile 2: Mixed-route distance
For riders combining urban sections, rolling gradients and longer distances. The priority is controlled energy use without giving up the reserve needed for a headwind or a steep section.
- DC Current: moderate, around 70–75% of the BMS rating. High enough that a climb does not stall, low enough that repeated starts stop spiking.
- Accelerate Strength: moderate.
- PAS levels: evenly spread, so the rider can step up for wind or gradient without jumping straight to maximum.
- Speed limit: a realistic cruise. Sustained high speed costs more energy than any amount of acceleration tuning saves, because air resistance rises with the cube of speed.
- Rider input: keep pedalling through starts and climbs; the torque you add is current the battery does not have to supply.
This profile pairs naturally with a larger pack. A 52V 25Ah Taishan holds 1,300 Wh nominal; a 52V 30Ah HS-II holds 1,560 Wh. Both are 97 mm thick, so the decision between them is usually about triangle height rather than width: the Taishan’s case is 157.4 mm tall, the HS-II rises to 195.4 and 281.3 mm on its upright edges.
Profile 3: Private-land performance
For off-road or private-land use where higher output is lawful and permitted. This is where a 2000W system’s reserve becomes obvious, and where weak bicycle components get found out fastest.
- DC Current: higher, but still within the BMS, connector and wiring ratings. The Smart eBike Controller with App Programmable Settings fitted to KirbEbike’s 2000W–3000W kits will happily request more than an Entry pack can give; match the ceiling to the pack, not to the controller.
- Accelerate Strength: increase in steps. Test traction after each change on a surface you know.
- PAS levels: reserve the top two levels for open sections rather than making every level full output.
- Speed mode: unrestricted only where use is lawful, safe and permitted.
- Mechanical checks: torque arms fitted and inspected, dropouts checked, rotor and caliper clearance verified, tyres and brake pads in good condition.
A performance profile is not a one-off software exercise. High-load use heats the controller and increases forces at the axle, rim, spokes, tyres and brakes. Check fastener torque, connector condition and wheel true regularly.
The Profile Matrix
Pin this to the workshop wall. The values are starting principles, not universal numbers: rider mass, battery age, wheel diameter, tyre grip and controller version all move them.
| City control | Mixed-route distance | Private-land performance | |
| DC Current (% of BMS rating) | 55–60% | 70–75% | Up to ~85%, never above |
| Accelerate Strength | Low | Moderate | High, raised in steps |
| PAS spacing | Tight at levels 1–3 | Even ladder | Top levels reserved |
| Speed ceiling | Local rules / comfort | Realistic cruise | As permitted off-road |
| Checks before use | Battery lock, brakes | Tyre pressure, charge level | Torque arms, spokes, rotor clearance |
Reading the live data screen before you change anything
The app’s live screen is the most under-used page on the bike. Four readings on it tell you whether a profile is working before you have ridden far enough to form an opinion.
| Live reading | What a healthy profile shows | What a problem looks like |
| Battery voltage under load | Drops 2–4V on a hard pull, recovers immediately | Drops 6V or more, or keeps falling on a climb — pack, connector or current ceiling too high |
| Battery current | Climbs smoothly to the ceiling and holds | Spikes to the ceiling on every start — Accelerate Strength too high |
| Controller temperature | Rises slowly, plateaus well below the limit | Climbs steadily on a flat road — airflow or mounting problem |
| Fault codes | None | Brake-signal held, Hall or phase faults — wiring, not tuning |
On the 52V 2000W ebike conversion kit used for these profiles, the voltage reading alone caught a mistake that would otherwise have been blamed on the battery: a current ceiling set ten amps too high for a 40A Entry pack, which showed as a 7V sag on the first hill. Lowering the ceiling under the BMS rating put the sag back at 3V and the cut-outs stopped. Ten seconds with the live screen, no tools.
Keep the screen open for the first few rides of every new profile. Change one value, ride the same hill, read the same four numbers.
How to build and test a profile without guessing
The sequence matters more than the values.
- Save or photograph the factory settings. You will want them back.
- Confirm the electrical match: motor voltage, controller current range, battery voltage family, BMS continuous rating, connector type.
- Pick a traffic-free test area. A car park on a Sunday morning is ideal.
- Set DC Current first. Test a few starts and one representative climb before touching anything else.
- Adjust Accelerate Strength in small steps, keeping the current ceiling fixed.
- Set PAS percentages and speed limits last, once the basic response feels right.
- Export the finished profile with a clear name and date.
On the 2000W build used for the three profiles above, the whole process took two short sessions. The mistake that cost the most time was changing current and ramp together on the first attempt: the bike felt worse and there was no way to tell which change was responsible.
What programming cannot solve
Software cannot compensate for a battery that cannot supply the requested continuous current, a loose XT60 connector, damaged dropouts, undersized brakes or a battery case that does not fit the frame. Self-learning routines help a controller identify motor phase and Hall wiring; they do not prove that every electrical and mechanical component is suitable for the load.
Nor can a setting rewrite the law. In Great Britain, a cycle outside EAPC limits — 250W continuous rated power, assistance ending at 15.5 mph — is not made an EAPC by selecting 25 km/h in an app. In the United States the federal low-speed definition uses 750W, and state and local rules decide the rest. The rated power of a 2000W motor stays 2000W whatever the display shows. Use high-power profiles where they are lawful, and check the complete vehicle’s classification before any public-road use.
]
Controller wiring harness with the XT60 battery lead and self-learning motor connectors labelled
Frequently asked questions
What is the best Accelerate Strength setting for city riding?
There is no universal number, but the right approach is the same for everyone: start low, test progressive starts somewhere safe, and raise it only if pull-away feels too weak. Rider mass, wheel size and surface grip all change the answer.
Can I save separate profiles for different riders?
Yes, where the app supports export and import. Name them clearly, include the date, and keep the factory configuration as a fallback.
Does lowering DC Current increase range?
It can, on stop-start routes, because it removes current spikes and discourages hard acceleration. If cruising speed stays high, the gain is small. Speed is the bigger energy cost.
Why does my controller cut out when I raise DC Current?
The ceiling is probably above what the battery’s BMS can deliver. Lower it back under the BMS continuous rating with margin. If cut-outs continue at a sensible setting, look for a resistive connector or a tired pack rather than raising the limit again.
Is walk mode worth enabling?
On a converted bike carrying a 6–7 kg battery and a hub-motor wheel, yes. A 6 km/h walk assist makes ramps, platforms and tight storage spaces far easier.
Publisher metadata
- SEO title: Ebike Controller App Settings Explained: Current, Assist, Speed
- Meta description: What DC Current, Accelerate Strength, PAS percentages and speed limits actually control, with three tested profiles for one 2000W kit and the BMS rule that sets every ceiling.
- Suggested URL: /ebike-controller-app-settings-explained/
- Target publisher: widemagazine.co.uk
- Link 1 (≈50%): “Smart eBike Controller with App Programmable Settings” → https://kirbebike.com/products/displays-and-controllers
- Link 2 (≈62%): “52V 2000W ebike conversion kit” → https://kirbebike.com/products/52v-2000w-mtx-rim-ebike-kit
- Image 1: https://cdn.shopify.com/s/files/1/0621/8412/8665/files/Group1940699782.webp — alt: Smart ebike controller with its full wiring harness, Bluetooth programming dongle and labelled connectors
- Image 2: https://cdn.shopify.com/s/files/1/0621/8412/8665/files/Group1000018422.webp — alt: Controller wiring harness with the XT60 battery lead and self-learning motor connectors labelled
Visit More : widemagazine.co.uk
